Monday, May 31, 2010

White Kurta Top,Beige Net Shrug ,Some Accessories & a Wooden Railing...

Was getting late for office & the first thing i saw was this white top...I immediately paired it with mi light blue jeans …hmmm…but tat wasn't enough for me...I searched for something more & caught hold of this beige net shrug I had got from my latest visit to Goa!!!.... Also added some Accessories & got this look…


OUTFIT DETAILS
White Kurta Top from Fashion Street(Steal deal as only got it for Rs150)
Net Embroided Shrug & Shoes from Goa Street( Steal deal Shrug as only for Rs 150)
Jeans from MNG
Bracelet from Accessorize & Hill RD
Oxidized Gold Neckpiece from Bandra
Jute Bag from Guess

Saturday, May 29, 2010

Brick Wall With Green Puffed Sleves Shirt & Black Jeggings!!

This Brick Wall is right outside my office & i just love the rustic look it has...
This is how i combined my one size big green shirt with a wrap belt & black jeggings
..


OUTFIT DETAILS:
Green Puff Sleve Shirt from Beneton
Black Jeggin from Only( Its called Jeggin cause its in between jeans & a leggin!)
Cloth Warp Belt from Topshop
Bag from Aldo
Shoes From MNG( Steal Deal as was bought for just Rs 500 in sale!)
Neckpiece & Bracelets from Colaba Causeway

Friday, May 28, 2010

Here comes the Bride!!!

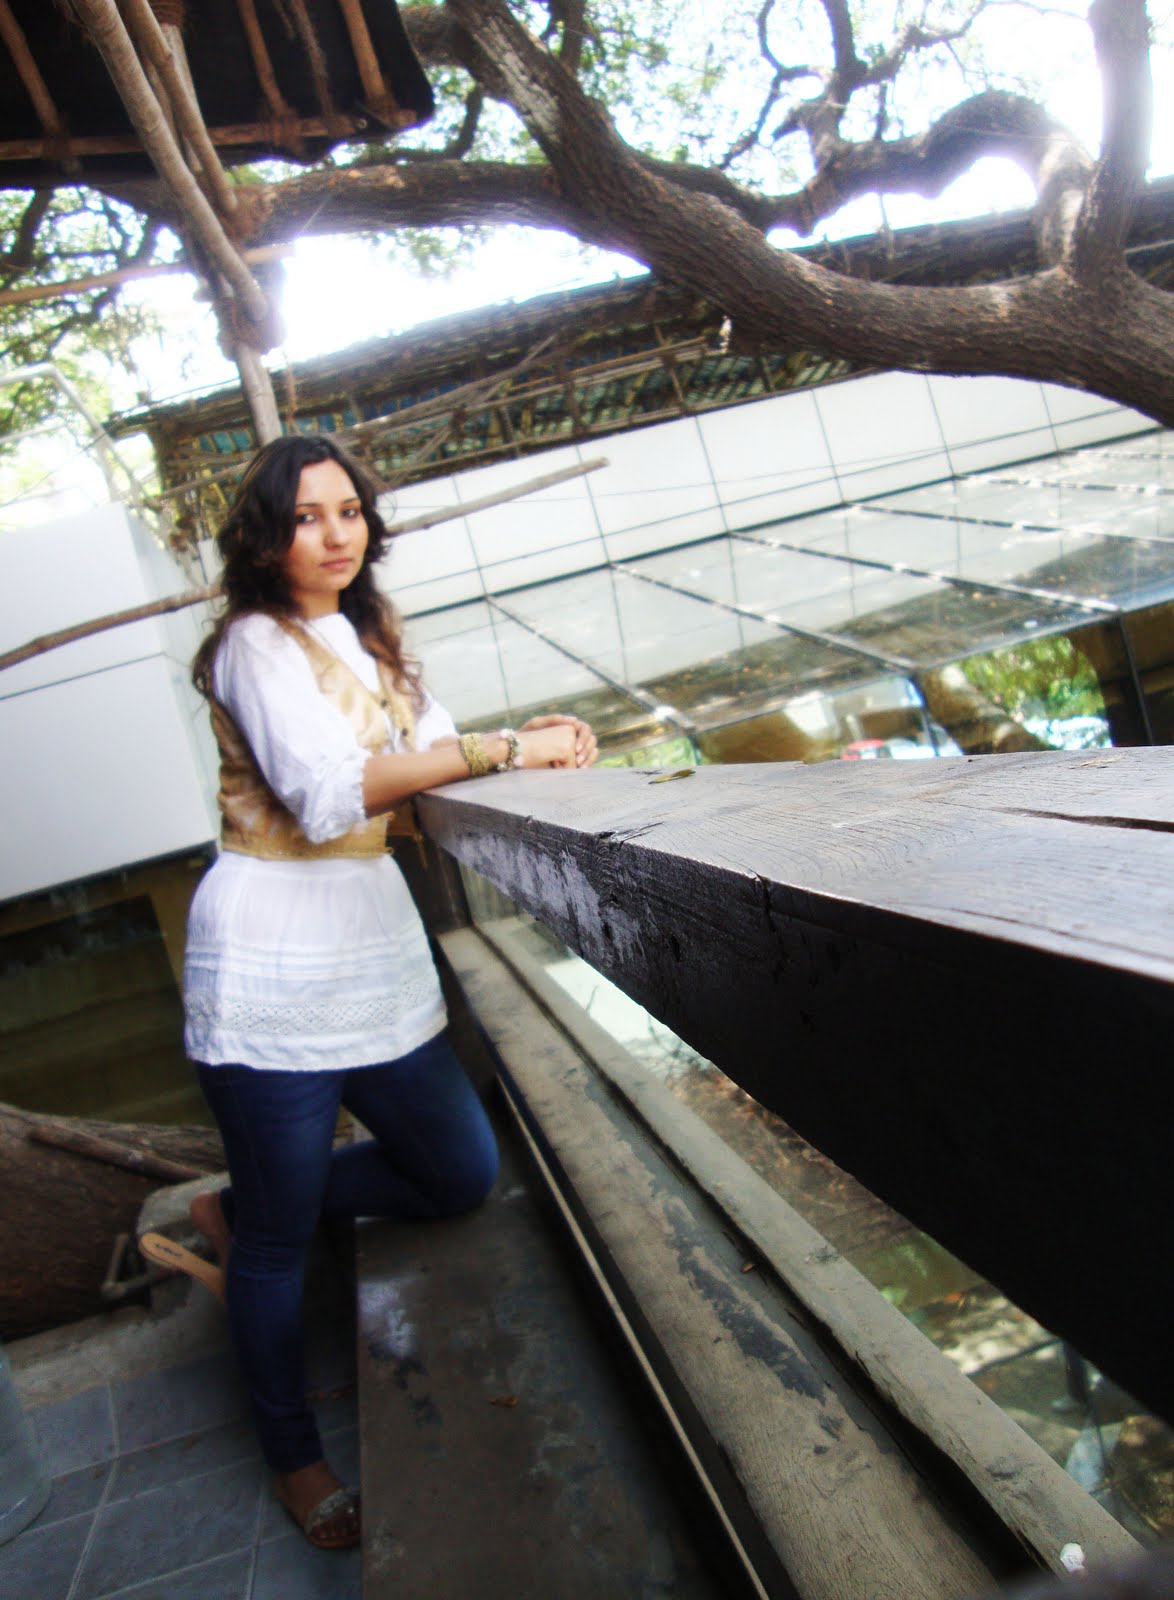
when this bride came to me i noticed her skin was in decent shape & was fair but her eyes were droopy & also she had scanty hair...so i had to make her eyes look bigger & brighter & also i made her wear some extensions...This is what i managed to do.....

BEFORE MAKE UP


AFTER MAKE UP


Her nose was slighter broader so i had used a liltle contouring ....


I have used atleast 5 shades to get this look of the eyes....she wanted it to be smooky but yet traditional...


You can follow the eye makeup ideas to make your eyes look expressive and larger


Make Up Tips For Droopy Eyes

You can apply a liquid eye liner or a sharp eye liner pencil to draw the line around the upper eye lashes in a rising sloping style. This will give the eyes a brighter look.
Draw the line with liquid eye liner or a sharp eye liner pencil till it reaches the outer edges of your eyes.
Always opt for a bone colored eye shadow for droopy eyes. Use the eye shadow on the top of your eye lashes. If you want you can also use eye shadow on the inner V of the eyes.
Apply dark or medium shade eye shadow from the crease of your eye to the brow bone. This make your droopy eyes look open out.
Always apply a subtle highlighter. To highlight your upper part of your eye you can use a subtle highlighter below your brow.
You can also apply fake eye lash pieces on the outer edges of the eyes. If you want you can also curl it along with the natural lashes.
Droopy eye makeup is not complete without mascara. You can apply mascara to upper eye lashes.
You can use shimmer in the inner corner of the eyes. Shimmer will make your droopy eyes look larger. Silver eye shadow can work wonders for your droopy eyes.
Apply contour color on the outer edges of the upper lashes. You can also use contour shade along the entire lash line.


Eye Colours For Droopy Eyes

You can choose a neutral colors highlighter for droopy eyes. Always opt for an eye make shades which is different from your eye color.
Eye shadows highlight the droopy eyes. Colors like soft charcoal, black, pink, orangey brown and pearly beige suits the droopy eyes the most.
If you apply a Kohl pencil then choose black and brown color .
Eyebrow pencil shades like brown gray or black gray are suitable for droopy eyes.
If you opt for mascara then choose a shade that is close to the color of your natural eye lashes.

Eye Makeup Products:
Mascara
Eye Shadow
Eye liner
Eye Pencil
Shimmer
Highlighter

Thursday, May 27, 2010

Pink Top,Washed Blue Denin Skirt & A Flower Srunchie ...

I felt like wearing pink so I spotted my pink T & paired it with my Blue faded Denim Skirt….This is how I mixed my accessories to get this look….


OUTFIT DETAILS:
Pink Top from Hill Rd (Steal buy of the day ,just for hundred!!!)
Washed Denim Shirt & Thin white Belt from MNG
Bag from Beneton
Flower Neckpiece & Bracelets from Accessorize
White Flower Srunchie from Goa
White Gladiater Shoes from Atmosphere

Lady In Black With Elements Of Pink....

I wore this to an event in Blue Frog, it was a Hip Hop Hustle night & I was supposed to go there after a heavy day of work. No issues, I say & rushed to a friends house nearby just wore this Classic Back Dress & teamed it with these Fuchsia Pink shoes & Guess Clucth (was wanting to wear them since long now!!!)…let my hair down with a little mousse & blushed my cheek a little…painted my lips in a shade of pink…smoked my eyes a bit with black & was Ready To Go…


Wednesday, May 26, 2010

Blushing Secrets Just Revealed...So Keep Blushing!!!

HOW TO APPLY YOUR BLUSH
Here is the correct and easy way to apply blush
First, start with a good quality Blush Brush. You can accentuate your face and cheeks naturally. Smile and you will see the fleshy part that stands out the most; this is the apple of your checks. This is your starting point for applying your blush. Apply a light layer of blush to the apples of your cheeks and blend up and back toward your hair line.
Tap off the excess blush from your brush before applying to your face. Do not blow on the bristles or you will put bacteria from your mouth on to the brush. Compact size blush brushes are too small and the bristles are not shaped properly. Once again, use a good quality brush.
Look in the mirror and smile.
Place powder blush on the apple of your cheek and gently brush up your cheekbone toward your hairline. It should go no closer to your nose, but directly beneath the iris of your eye; below nostril-level and into your temple hairline.

How and where you apply your Blush is determined by the shape of your face.
A ROUND FACE is almost as wide as it it's long, with the greatest width at the cheek. To slenderize, apply your blush in a sideways V on your cheekbones and blend up. To add an illusion of length apply a bit of blush to your chin and blend well.


A SQUARE FACE has a squared forehead about the same width as the cheekbones and jaw line. The squared jaw is the prominent feature. Beginning at the center of the eyes apply your blush on the cheekbones. Blend toward your temples and apply a dab to your forehead and chin to soften the square angle of the face.

A RECTANGULAR FACE is an elongated square shape. The forehead is about the same width as the cheekbones and jaw line. Apply blush on cheekbones below the outer corners of the eyes and blend well. Be sure the blush never extends lower than the tip of the nose.

AN OVAL FACE is said to be the ideal face. The forehead is wider than the chin. The cheekbones are dominant with the face tapering from the cheeks to a narrow oval chin. Use your fingertips to locate the most prominent part of your cheekbone to apply blush and blend towards your temples to highlight your cheekbones.

A TRIANGULAR FACE has a wide forehead and high cheekbones. The triangular face tapers to a narrow chin. Blush should be applied in a sideways V on the cheekbones. Blend up from your cheekbones to your temple and then extend the blush over your brow a bit toward the center of your forehead. This will help to balance the width of your forehead with the rest of your face.

Things You'll Need:
Blush
Blush brush
Mirror

Instructions
Step 1
Select a blush that suits your purpose. Select a pink or peach shade of blush if you are using makeup to add color. Select a light shade of brown if you want to highlight your cheek bones.
Step 2
Apply blush to your blush brush and tap off any excess.
Step 3
Locate the top of your cheek bone with your finger. You will feel a bone about half way between the corner of your eye and the center of your ear.
Step 4
Place the blush brush on the top of your cheek bone; pull the brush down and under your eye, following the curve of your cheek bone. This should be the shape of a comma lying down.
Step 5
Disperse the blush from this line you just made down your cheek. Do not add more makeup for this step; just use the blush that has already been applied.
Step 6
Repeat on the other cheek.
Step 7
Even out your cheeks and add more makeup as desired using the technique above.
Step 8
Brush a little color along your nose, your chin and your hairline using the remaining makeup on your brush. This creates a sun kissed look.

Related Posts with Thumbnails